You will learn basics of Amazon DynamoDB used by java enterprise development experts for projects. In this post, you will learn about the key areas of this DB and connecting/manipulating CRUD operations with Amazon DynamoDB with Java
Introduction
Amazon DynamoDB is a NoSQL database. It is part of Amazon cloud service. The Amazon DynamoDB developed using Java Language. The Amazon cloud service provides Java based API for connecting to NoSQL Database. If Java based Amazon cloud Application requires NoSQL DB, the better choice is Amazon’s DynamoDB instead of going for other NoSQL DB. Following are the key factors to choose DynamoDB for Amazon cloud-based Java application.
- No need worry about DynamoDB installation/setup/configuration and hardware requirements.
- No need worry about DB Tuning for performance improvement. All DB related performance tunings are taken care by the Amazon Cloud service.
This article comprises of key areas of Amazon DynamoDB and connecting/manipulating CRUD operations with Amazon DynamoDB through the Java DynamoDB API.
 The structure of Amazon DynamoDB.
Amazon DynamoDB stored in following ways.
- Table
- Item
- Attributes
Table
The table is a top entity which stores the particular set of data, but it doesn’t store the data form of Row, column like RDBMS.
Item
An item is a collection object which has multiple key and values. The key representation of column and value representation of column’s value. The combination of key and value called as Attribute. The collection of attributes in the item is called as one row.
Attribute
The attribute is per column in the form of key and value pair.
Following is a diagram for a Logical data structure in Amazon DynamoDB.
 The table is a top layer which holds the Items and Attribute. Item is a second layer which holds the list of attributes. The third layer attributes.
Installing and starting Amazon DynamoDB
Download Amazon DynamoDB library from the following URL
http://docs.aws.amazon.com/amazonDynamoDB/latest/developerguide/DynamoDBLocal.html
In order to run the DynamoDB, the system needs Java 1.6 or later version.
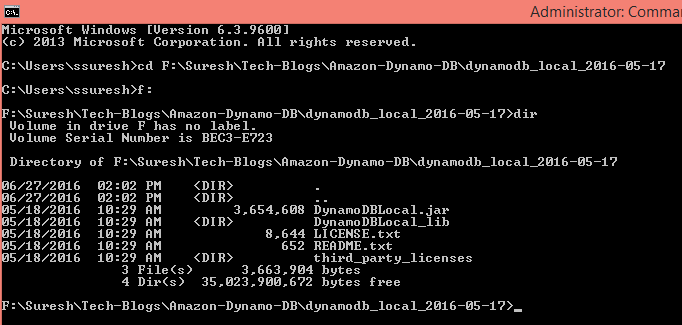
Extract the jar from the zip file. Open a command prompt and go to the folder location where you extracted as in below screenshot.
 Apply following command in the command prompt to start Amazon DynamoDB.
java -Djava.library.path=./DynamoDBLocal_lib -jar DynamoDBLocal.jar -sharedDb
Once the DB started, followings are showed in the command prompt console.
 In order to work with Amazon DynamoDB, you need to sign up with Amazon Cloud service. Below link is explaining about the signup process and creating credentials for Amazon DynamoDB credentials.
http://docs.aws.amazon.com/AWSSdkDocsJava/latest/DeveloperGuide/getting-started-signup.html
Once you sign up with Amazon DynamoDB, follow below steps to configure the credentials in the local system.
Go to following the location of your windows system.
<yourdrive>\Users\<usernameFolder>\.aws
Example: C:\Users\ssuresh\.aws
Create a file and name it “credentials” and add credentials like below.
[Default]
aws_access_key_id={Your key Id}
aws_secret_access_key={Your Access key}
Once you are done above steps, stop the DynamoDB server by CTR-d and restart the server by applying following command
java -Djava.library.path=./DynamoDBLocal_lib -jar DynamoDBLocal.jar –sharedDb
Connecting and CRUD Operation with Amazon DynamoDB using DynamoDB Java API
CRUD Stands for Create, Read, Update, and Delete.
Below code is connecting with Amazon DynamoDB using Java API
publicvoidcreateCustomerTable() {
AmazonDynamoDBClientclient = newAmazonDynamoDBClient();
client.setEndpoint(“http://localhost:8000”);
DynamoDBDynamoDB = newDynamoDB(client);
String tableName = “customer_info”;
Table table = DynamoDB.createTable(tableName,
Arrays.asList(
newKeySchemaElement(“customer_id”, KeyType.HASH)), //Primary key
Arrays.asList(
newAttributeDefinition(“customer_id”, ScalarAttributeType.S)),
newProvisionedThroughput(10L, 10L));
System.out.println(“Table status: ” + table.getDescription().getTableStatus());
}
The above code connects to the DynamoDB which installed on the local computer. DynamoDB API initializes the DB connection. Then, creates a new table called “customer_info” by create Table method. The customer_info is having one primary key called “customer_id”. Don’t have to define other columns in DynamoDB because at the time of inserting data, we can mention the other column name.
The above code returns the following about.
Table status: ACTIVE
Active denotes that table created successfully in the Amazon DynamoDB.
Inserting rows in Table
publicvoidinsertCustomerRow() {
AmazonDynamoDBClientclient = newAmazonDynamoDBClient();
client.setEndpoint(“http://localhost:8000”);
Map<String, AttributeValue>row = newHashMap<String, AttributeValue>();
row.put(“customer_id”, newAttributeValue(“1”));
row.put(“customer_name”, newAttributeValue(“Suresh”));
row.put(“customer_type”,newAttributeValue(“Premium”));
PutItemRequestputItemRequest = newPutItemRequest(“customer_info” ,row);
PutItemResultputItemResult = client.putItem(putItemRequest);
System.out.println(“Successfully Stored in customer_info Table”);
}
The above code connects to DynamoDB and creates a new row using Map object. Map key representation of table columns and map value is column value it is a form of AttributeValueobject.PutItemRquestprepare the request data which necessary for inserting a new row in the table. Based on the above example,PutItemRquestprepares the request data from the map object and make it ready for inserting a new row in customer_info Table.putItem is a method which used to insert new row by passing PutItemRequest as a parameter.
Output:Successfully Stored in customer_info Table
Fetching data from AmzonDynamoDB
publicvoidfetchCustomerInfoById() {
AmazonDynamoDBClientclient = newAmazonDynamoDBClient();
client.setEndpoint(“http://localhost:8000”);
HashMap<String, Condition>scanFilter = newHashMap<String, Condition>();
Condition condition = newCondition()
.withComparisonOperator(ComparisonOperator.EQ.toString())
.withAttributeValueList(newAttributeValue().withS(“1”));
scanFilter.put(“customer_id”, condition);
ScanRequestscanRequest = newScanRequest(“customer_info”).withScanFilter(scanFilter);
ScanResultscanResult = client.scan(scanRequest);
List<Map<String,AttributeValue>>resultList = scanResult.getItems();
System.out.println(“Customer Info: ” + resultList);
}
The above code connects to DynamoDB and fetching customer info row by passing customer Id.
Condition API is used for passing various conditions. In the above example, Equal operator passed in condition API. Customer_id passed in where clause using scanFilter.put method. The value of customer id passed in with S method. The “S” represents that customer_id is String type. The above code fetches the customer information belongs to customer_idis 1.
Output: Customer Info: [{customer_type={S: Premium,}, customer_name={S: Suresh,}, customer_id={S: 1,}}]
Updating existing data
publicvoidupdateCustomerRow() {
AmazonDynamoDBClientclient = newAmazonDynamoDBClient();
client.setEndpoint(“http://localhost:8000”);
Map<String, AttributeValue>row = newHashMap<String, AttributeValue>();
row.put(“customer_id”, newAttributeValue(“1”));
AttributeValueUpdateattributeValueUpdate = newAttributeValueUpdate(newAttributeValue(“PremiumGold”),”PUT”);
Map<String, AttributeValueUpdate>uRow = newHashMap<String, AttributeValueUpdate>();
uRow.put(“customer_type”, attributeValueUpdate);
UpdateItemRequestupdateItemRequest = newUpdateItemRequest(“customer_info”, row, uRow);
client.updateItem(updateItemRequest);
System.out.println(“Successfully updated customer_info Table”);
}
The above code updates the customer data. AttributeValue API creates the where condition. The above code passes the customer_id in where clause. AttributeValueUpdate accepts the actual column need to change. The above code passes customer_type as a “PremiumGold”. The “PUT” denotes that update the given data in the respective row.
Output: Successfully updated customer_info Table
Deleting exiting row
publicvoiddeleteCustomerRow() {
AmazonDynamoDBClientclient = newAmazonDynamoDBClient();
client.setEndpoint(“http://localhost:8000”);
Map<String, AttributeValue>row = newHashMap<String, AttributeValue>();
row.put(“customer_id”, newAttributeValue(“1”));
DeleteItemRequestdeleteItemRequest = newDeleteItemRequest(“customer_info”, row);
client.deleteItem(deleteItemRequest);
System.out.println(“Successfully deleted row from customer_info”);
}
The above code delete a row from customer_info table. Passing customer_id using DeleteItemRequestAPI and deleteItem method delete the row from customer_info table.
Output: Successfully deleted row from customer_info
Hope with this post, java enterprise development experts have made you understood how to install and start Amazon DynamoDB. If you have any confusion, ask them directly and get answers soon. You can even share your experience with them by commenting below
Conclusion
This article gives a good idea about the Java API for Amazon DynamoDB. What type of project can use Amazon DynamoDB? If your project is handling large amount data, high DB hits involve and doesn’t deal with complex transactions, then DynamoDB is good to use in your Project. If your project is finance/payment based and involves a transaction, then DynamoDB is not a god idea to use but, still, you can use DynamoDB for storing logging and non-transactional data.